How Google Analytics' Product List Performance Improves Reliability

Through the standard implementation of the enhanced e-commerce tracking, data in the Product List Performance Google Analytics are inflated.
This is because many users do not always scroll down until the bottom of long pages such as the category or search results pages. Regardless of the user’s behaviour, the standard implementation sends the entire e-commerce impressions object contained in the dataLayer to Google Analytics.
This inflates the product list views metric making the report less reliable. However, a very useful application, of the recently added element visibility trigger in Google Tag Manager, enables a solution capable of sending product impressions only when the products are actually displayed on the screen.
THE ISSUE THAT INSPIRED THIS ARTICLE
While working on a project for one of our clients at Dept, we noticed that on some pages the hit to Google Analytics was not sent. Yet, the pageview tag was firing correctly in Google Tag Manager according to the preview window. This unexpected behaviour, however, did not affect all the pages: from the home page or the product detail page for instance, the hits were sent correctly.
When investigating the issue, we noticed that the pages containing all the products of the site, e.g. the category page or the search results page, were the only ones affected.. Analyzing the Google Chrome console tab through the Google Analytics debugger browser extension, we eventually found out that in one of these pages the hit payload exceeded the maximum allowed size of 8192Kb.
The next step was to find the reason for such a large payload, therefore we inspected the hit and discovered a long list of product impressions details. A single category page or search result page was displaying more than 50 products causing the hit payload to exceed the limit.
A SOLUTION TO REDUCE THE HIT PAYLOAD SIZE
To avoid any loss of data we had to find a way to split the large pageview hit payload into several smaller units. To accomplish this goal we first deactivated the enhanced ecommerce features from the pageview tag and second we separated each product impression through single event tags so we basically created more hits but with lighter payloads.
We decided to use one of the recently added features in Google Tag Manager – the element visibility trigger – and apply it to this case. Via this trigger type we could send product impressions in single (or grouped) Google Analytics event tags that fired only when the products are displayed on the screen. In doing so we were be able to achieve two goals in one action:
- we reduced the hit payload size so we overcame the pageview hit being dropped
- we also improved the Product List Performance report in Google Analytics as this solution sends only actual product impressions details
In order to accomplish both goals, we needed to follow several steps divided in three main parts: (1) resolving the page view hits, (2) building the product impressions and (3) sending them via Google Analytics events.
RESOLVING PAGEVIEW HITS
Since the enhanced e-commerce features were responsible for the exceeding hit payload size we had to disable them from the GA pageview tag when firing on category and search result pages. To do so we had to modify the all pages trigger associated to the normal pageview tag to filter out the long pages. So we created a new trigger:
- Trigger type: Page view
- Fires on: some pages
- Filter: {{pageType}} does not equal to category
We used the {{pageType}} variable available in the dataLayer used for both category and search result pages - Name: Pageview – All pages except category pages
Once created, we connected it to the normal pageview tag. We then renamed the tag to highlightthe new firing conditions: UA – Pageview – all pages NO category pages.
Once we had deactivated the normal Google Analytics pageview tag from the category pages we needed to create a new tag, specifically for this page type, having enhanced e-commerce features disabled so not lose any page view data.
So, we made a copy of the tag UA – Pageview – all pages NO category pages and brought the following modifications:
- We checked Enable overriding settings in this tag
- In More settings > E-commerce > Enable Enhanced E-commerce Features, switched to False
- We removed the trigger associated to the tag and clicked on the + icon to create a new one
- We created a new trigger having the opposite filter, so: Page view on pages where {{pageType}} equals category
- We named the tag UA – Pageview – category pages only
ACTUAL PRODUCT IMPRESSIONS BUILD UP
After resolving the hits for the pageviews we needed to create the solution for the actual product impressions. To do so, we wanted to apply the element visibility trigger type and make sure to fire events only when the products were displayed on the screen. So, we started to build the following one:''
- Type: Element visibility
- Method: CSS Selector
- Selector: .product-boxEach product was contained in a HTML tag type having a specific class having name product-box. It is preceded by the period (.) to specify the class in CSS notation
- When: once per element
We wanted to consider all the products in the page - Minimum percentage: 80%
The minimum visible percentage can vary according to one’s own idea of product impression. We considered that 80% of the displayed product can be seen as a full impression - Observe DOM changes: unchecked
- Minimum time on page: unchecked
The appearance of the element on the screen is not a DOM change and no delay was needed - All visibility elements
As we did not want to filter out any product we made sure All visibility events was selected. - We named it Element visibility – Product selector
The second step of the impression build up phase consisted in fetching the impression details for the single products. To do so, the large dataLayer had to be “sliced” in parts and sent to Google Analytics in separate event tags through some custom JavaScript code injected in Google Tag Manager. The logic of the script was: for each product “seen” by the element visibility trigger then push a specific custom event and slice the equivalent product impression details from the entire dataLayer object.
In Google Tag Manager, we first created a data layer variable to store the entire dataLayer object from the page: ecommerce.impressions and we named it DLV – Ecommerce – Impressions. Then we built the script in a custom HTML tag.

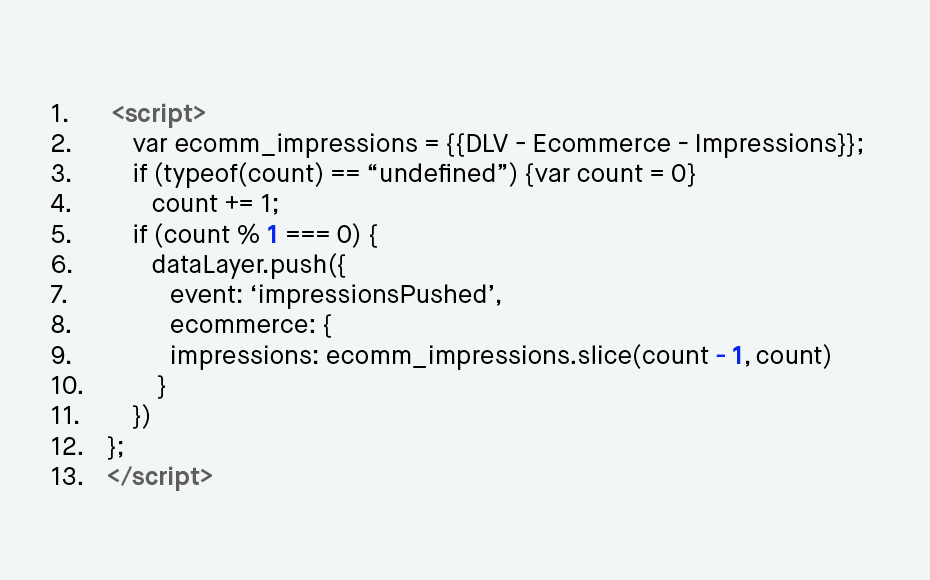
Line 2 sets the variable DLV – Ecommerce – Impressions. Line 3 sets the variable count (the counter of the products) to 0 if the value is undefined. The variable count turns to 1 the first time the tag fires (line 4). It grows by one unit each time the tag fires again, that is each time a new product appears on the screen. Line 5 sets the condition for the dataLayer push. If the variable count – (count/1) gives no remainder (so it is equal to 0), then the event impressionsPushed is pushed to the dataLayer. Since any number divided by 1 always equals that number, the remainder will always be equal to 0 so the dataLayer event and the impression details will be pushed for each single (and visible) product on screen.
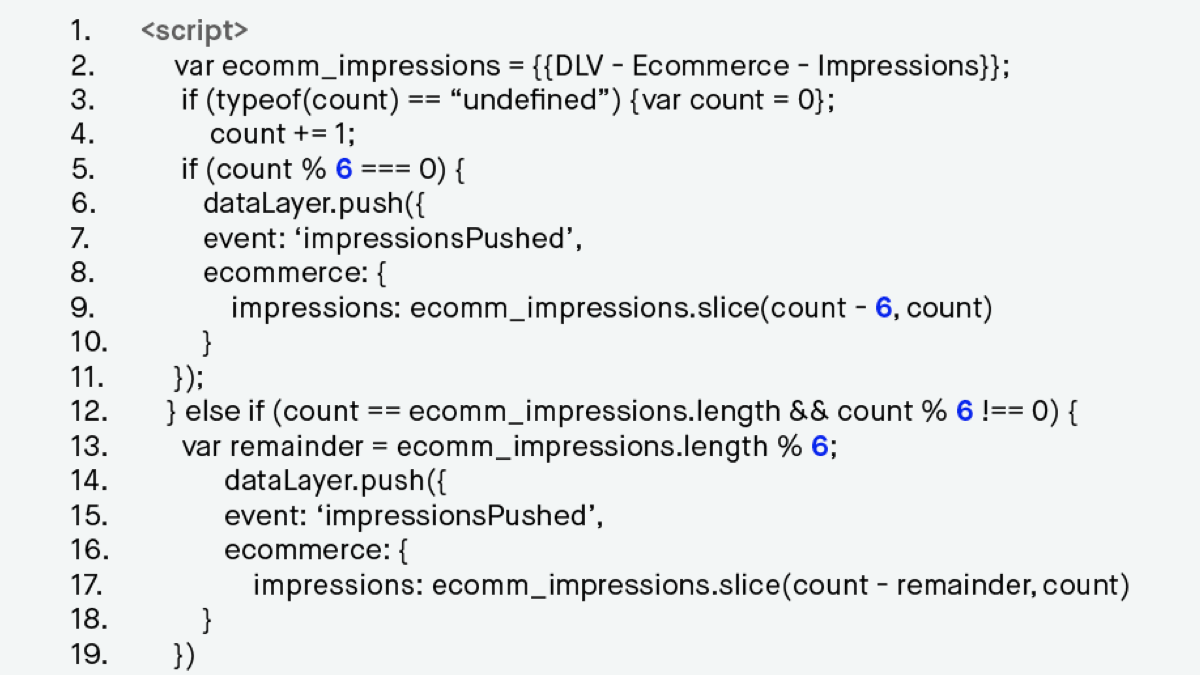
At this point, I think it is important to highlight that through this solution one single Google Analytics event for each product is sent. To limit the number of hits to Google Analytics and avoiding the risk of exceeding the quota limit of the free version, we could also group the products in clusters. Groups of 4 or 6 products could be a good trade-off as usually they are listed in rows of 2 or 3 on mobiles’ and desktops’ screens. An improved version of the previous JavaScript code, considering grouped impressions of 6 products, is displayed below.

If a bigger or smaller cluster is needed all the 6s in the script need to be replaced. From line 12 to 20 we needed to consider the quite common case that the total number of products in the page is not a multiple of the chosen product cluster number. Say that in our client’s page we had 50 products, the last 6-group would be sent at the 48th product on the page. Despite being shown in the screen products at positions 49th and 50th would not been sent unless they are collected by the remainder variable at line 13 and subsequent push at lines 14-17.
In both scripts, lines 8 and 9 slice the e-commerce object and fetch only the product details of the equivalent product displayed. For our case we opted for the second version. We named the tag HTML – Impressions on category pages and associated it to the trigger Element visibility – Product selector.
EVENT TO SEND THE PRODUCT IMPRESSIONS
The last phase was to collect the sliced bits of dataLayer and send them to Google Analytics. We created a Google Analytics event tag triggered by the custom events pushed by the HTML tag.
- Track Type: Event
- Event category: Enhanced Ecommerce
- Event action: {{Event}}
- (optional) Event label: {{Product name}}
- Analytics settings: Google Analytics global variable (EEC features enabled)
- Trigger: CE – Impressions pushed
- Custom event type, impressionsPushed thrown by the HTML tag
- Name of the tag: UA – EEC – Impressions on category page
IMPLEMENTATION CHECKLIST
To test our implementation we inspected several factors in the Google Tag Manager preview window. On the category page of the website we verified that:
- The UA – Pageview – category pages only (having EEC features disabled) tag fired
- The UA – Pageview – all pages NO category pages tag did not fire
- For each product seen on the screen (or 6-groups of products), there was a chain of events named elementVisibility and impressionsPushed in the events list of the preview window
- When inspecting the dataLayer at a given impressionsPushed event, the product list position and the event number of the dataLayer push matched
Through the Chrome Network tab we also inspected the event hit and verified that Ecommerce was set for the Event Category and Impressions for the Event Label. Furthermore, of course, the hit also displayed the EEC impressions details for a single product e.g. il1nm: category page (list name); il1pi1nm: kid t-shirt (first product name), il1pi1id: 0123 (first product id), etc.
NO MORE DROPPED HITS AND RELIABLE DATA AT ONCE
The actual product impressions solution allows us to address two not uncommon issues: it generates lighter hit payloads which never exceed the size limit and it remarkably improves the reliability of the Product List Performance report in Google Analytics. The two main components of our solution are represented by the handy element visibility trigger type available in Google Tag Manager, able to pinpoint each product shown on the screen, and the custom javascript code which slices the entire dataLayer into smaller units. I wish to thank my colleague Jasper Jansen for his huge contribution in this implementation.


